Easy small-batch homebrewing, part 1: Basic equipment
Posted on August 4, 2015 at 6:00 am
By Brian Vander Veen
I studied just enough chemistry as an undergraduate to earn a minor in the subject, at least before I made the eleventh-hour change to major in English and thus embarked on the long, circuitous route toward librarianship. But I’ve always loved chemistry—still do. And I certainly appreciate a well-crafted beer. So when I attended a library program several years ago about homebrewing, I figured brewing was right in my wheelhouse.
Yet, at the time, I was living in a tiny apartment with the budgetary mindset of someone still recovering from years of being a student with little discretionary income. I figured I had neither the money nor the space to start homebrewing. Browsing through online homebrewing forums—populated largely by homebrewing superfans bragging about their costly and elaborate home equipment—did little to persuade me otherwise.
About six months ago, though, I finally took the plunge. To my surprise, I found that despite all the shiny gear advertised in homebrew supply catalogs, the amateur brewer can get along fine with just a few basic items, some of which you may already have in your home kitchen. Part of the secret to cheap and compact homebrewing, it turns out, is brewing in small, one-gallon batches, which eliminates a lot of the bulky, specialized equipment required for brewing on a larger scale.
This week, I’ll be describing the equipment I use in my budget homebrewing setup, all of which you should be able to get through a local homebrewing store like Jim’s Homebrew Supply in North Spokane, Nu Home Brew in Spokane Valley, or from any number of online retailers. Next week, I’ll talk about the ingredients you’ll need, along with a recipe of my own to get you started.
Sanitizing
When you make beer, you’re essentially cultivating microbes in a sugary solution. You’ll want to ensure that you’re cultivating only the right kinds of microbes. The wild yeasts and bacteria that can survive uninvited in a batch of beer aren’t likely to make you ill, but they can produce all kinds of unexpected and unpleasant flavors, so maintaining sanitary conditions is essential.
One nice thing about small-batch brewing, though, is that minimalism is your friend as far as sanitation is concerned. The fewer containers, implements, and gadgets you use, the smaller the chance that you’ll end up with an infected beer. Nonetheless, you’ll want to sanitize everything that’s going to touch your brew once it’s done boiling.
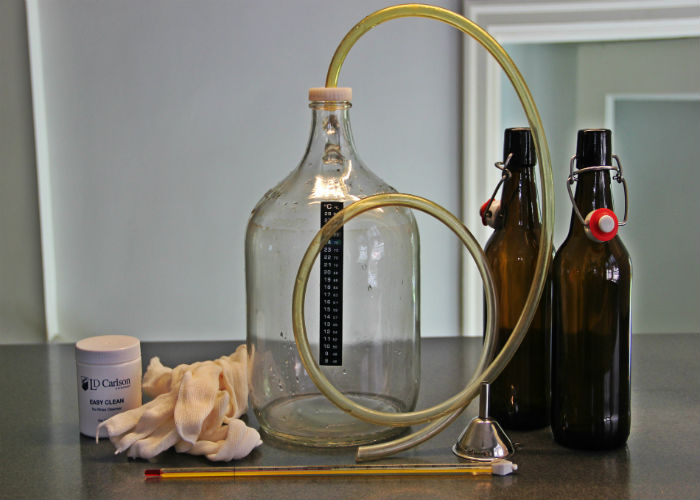
I’ve had cheap and effective results cleaning all my equipment with the powdered oxygen-based cleaner you can find in homebrew supply stores under brand names like One Step or Easy Clean. You just mix a tablespoon into a gallon of warm water and thoroughly wash all your equipment with the solution, no rinsing required.
Technically speaking, it’s not a sanitizer by strict government definition, but it’s frequently used as such by homebrewers, including myself, and I’ve yet to have an infected beer. An 8oz container averages about $5, depending on the brand, which will last you quite a few batches.
Total: $5, more or less
Brewing
The first stage of the brewing process is creating something called wort. The name sounds gross, but wort is basically the sweet infusion of malt and hops that you’ll later ferment into beer. To make your wort, you’ll need something to boil it in. For one-gallon batches, you’ll be fine with a typical kitchen stock pot and some sort of stirring implement, both of which I figure you’re likely to have already at home.
When making your wort, you will need something to contain your hops as well as any steeping grains your recipe may require, for which you can use simple muslin bags much like oversized tea bags. They run about $5 for a ten pack, and if you’re scrupulous about rinsing them out after each use, you can reuse them a few times before they need to be retired.
Finally, brewing is as much science as art, so you’ll also want a couple of basic tools for accurate measurements. You’ll need a thermometer, for example, but a cheap lab thermometer works just fine. The one I use goes for $8 or so. And for measuring ingredients, you’ll probably want a kitchen scale with fairly fine resolution. We already had one at home that measured in one gram increments, but you can find one for $20 or so if you shop around.
Total: $13 if you already have a stock pot and kitchen scale
Fermenting
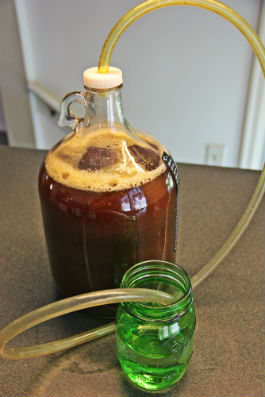 Once you’ve boiled and cooled your wort, you’re going to transfer it to your fermentation vessel, add yeast, and let it sit for at least a week in a cool, relatively dark place. For this part, I use a one-gallon glass carboy and a shelf in a dark corner of my basement. You’ll also want a funnel handy for when you have to pour your wort from the stock pot into the narrow neck of your carboy, which you may well already have lying about.
Once your wort is in your carboy, you’ll also need something to let out the gasses produced by fermentation while keeping outside air from contaminating your brew with unwanted microbes. Homebrew starter kits usually come with a screw cap or rubber stopper with a hole and a plastic airlock for this purpose.
I do find, however, that those plastic airlocks tend to get fouled up by a vigorous fermentation, so instead, I opt for a simple setup called a blow-off tube: a length of plastic tubing with one end stuck in the hole on your cap or stopper with the other end submerged in sanitizing solution in a pickle jar or similar container.
I picked up a one-gallon carboy with a cap, airlock, and plastic tubing included for about eight dollars total. I trust you won’t have any trouble finding a pickle jar to use for the other end of your fermentation setup.
Total: $8, a kitchen funnel, and a pickle jar
Bottling
To bottle your beer, you can use standard crimp-top beer bottles, but you’ll also need bottle caps and a bottle capper, and the latter can run anywhere from about $20 for the hand-held version to $50 or more for the more robust, bench-top version.
I settled on the cheaper option of reusing flip-top bottles from store-bought beer. Amber bottles, like those used by German brewer Der Hirschbräu, are ideal as they protect your beer against UV light more effectively than green or clear bottles, but any flip-top bottle should work. You can also buy flip-top bottles in bulk, if need be.
Finally, you’ll also want a way to get your beer out of the fermenter and into your bottles without disturbing the sediment, or trub, that will inevitably collect at the bottom of your carboy. A handy device called an auto-siphon, combined with a length of plastic tubing, allows you to siphon the beer from your fermenter into your bottles without a lot of mess. A small auto-siphon suitable for one-gallon batches is about ten dollars.
Total: $10, not including the beer you’ll have to drink in order to harvest the bottles
So, in total, the specialized equipment you need comes out to under $40, assuming you have a few basic items lying about your kitchen. That’s really all the equipment you need to get started brewing your own beer at home.
Stay tuned for next week when I’ll give you the basics on ingredients and a recipe to get started!